In a previous article introducing the essential tools for expert software developers and engineers, the Text Editor came in at the top of the list. Visual Studio Code (aka. VS Code) is currently the most popular text editor in the market. It’s free and backed by Microsoft. However, it can be overwhelming when you start using it, especially if you haven’t used a text editor before. This article will introduce the basic features you have available in VS Code and later go into more advanced functionality. At the heart of mastering any tool as a knowledge worker—and this is a really well kept secret—is to memorize the keyboard shortcuts of your most common actions. So here are links to the keyboard shortcuts in VS Code for Windows, Mac, and Linux as a quick reference for later.
For more detailed installation instructions, watch the video below:
The Basics of Text Editing in Visual Studio Code
Any file that is created or edited in a text editor is ultimately just a plain text file with a special extension (or ending characters) representing the syntax of the programming language that file is written in. For example, HTML code has the file extension .html, JavaScript files have the extension .js and Python files have the extension .py. Based on the file extension, a computer will automatically try to run that file using the right program.
Usually, all of the files in a specific project are inside a top-level folder. This makes editing them easier because it prevents you from having to go to different folders in your computer to find files relevant to the same project. So, start by creating an empty folder inside a commonly accessed folder like Documents, where you will add files for your project. I’ll call mine testfolder but I recommend you pick a different name. We will create a very simple web project using HTML to get started inside this folder.
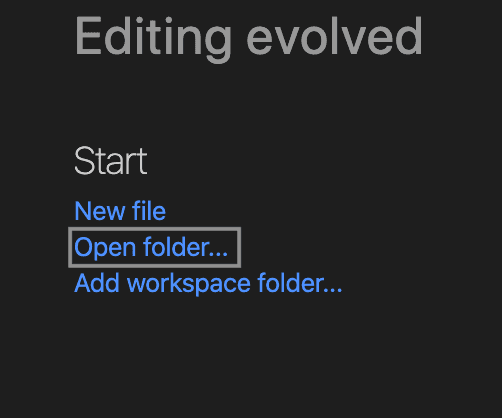
Once you’ve created the empty folder, open up Visual Studio Code. If it’s your first time opening it, you may see a welcome screen that prompts you to create a new file or folder.

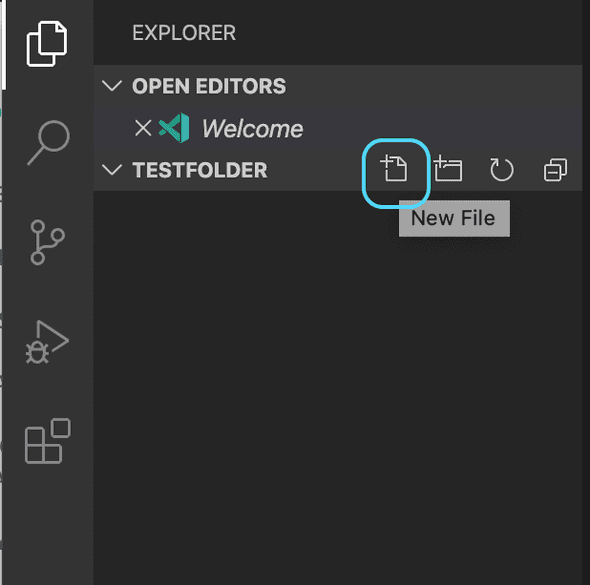
If you don’t see the excerpt in the image when you open VS Code, click on the File menu on the top-left and select Open or Open Folder to select the empty folder you created earlier. This will open the folder inside VS Code’s file explorer sidebar. Although the sidebar looks empty at first, if you mouse over the part next to your folder’s name you’ll see a few icons appear. Click on the first one to create a new file, like shown below. Call this new file index.html.

The biggest advantage of creating a new file with this icon is that for larger projects with multiple folders, this button will create a new file in the folder that you currently have highlighted. This allows you to create multiple files across several folders in your project very quickly. You can also right-click the newly created index.html file to unlock other file editing options.
The Sidebar - a hub of Plugins to power up your editor
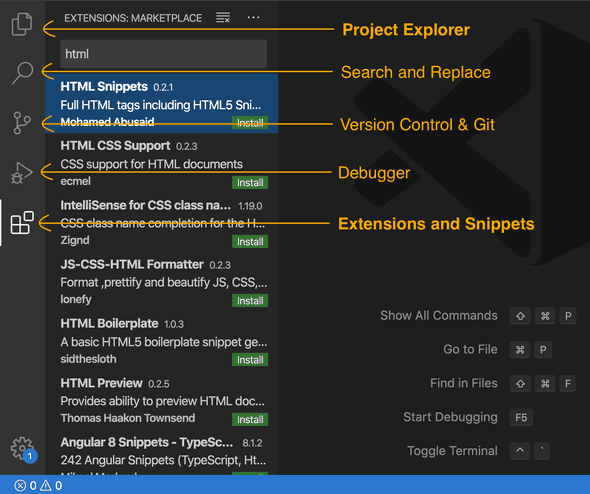
The left sidebar in VS Code is a centralized hub for accessing the most powerful functionality available in the editor. It comes with a standard set of tools like the file explorer, search bar, version control, debugger, and a way to install extensions. An overview of these options is shown below.

The first and last options in the image are bolded to outline their usefulness. When you are focused on just writing code, it’s not useful to have any of these sidebar options open because they just take up extra screen space. For larger projects, though, you may keep the file explorer open (first option) for faster navigation. When you are looking to enhance your productivity when writing code or just changing up the look and feel of your editor, that’s when the last option is helpful for exploring new extensions to install in your editor. These extensions are commonly code snippets, color themes, or better interface elements like icons and custom coloring. The middle three options tend to be useful in professional environments and larger projects.
Other useful tools and settings
In the image above, you can access other useful settings from the error (x) and warning (!) icons on the bottom left. This will open a window for any code errors or warnings caught by linters and compilers that process your code. The most important tool that can be accessed from here, though, is the Terminal on the right that appears after clicking on the error and warning icons. To make the best use of it, make sure it’s a bash or Unix Terminal (separate download on Windows). The Terminal’s purpose and usefulness are outlined in this article on essential tools for software developers.
Finally, you may want to make adjustments to Font Size, Font Family, and Color Theme. The best way to access these presentational options and other more esoteric settings is by using two specific shortcuts: CTRL (or CMD) + , for adjusting editor settings and CTRL (or CMD) + SHIFT + P for accessing the command palette. While these two pages are outside the scope of this article, they have great searching functionality for finding the right options you are interested in. The one freebie that’s worth including in this article is the code command integrated into the Terminal. This option is available in the command palette by searching for ‘code’ and selecting the option Shell command: Install ‘code’ command in PATH. Also note that many extensions you install will have their commands available to execute through the command palette so its usefulness increases the more you customize your editor. So customize away with extensions and adjustments!